CSS Basics
CSS stands for Cascading StyleSheets and is used to modify the appearance of a web page, including fonts used, text size, colors, spacing and layout. It is a distinct language from HTML – which means it’s written in a different style and has different rules – yet has a close relationship with HTML because it affects and changes HTML elements.
That pretty much sums up the stylesheet part of the name – it’s a file that outlines the stylistic rules for another document – but what about cascading? That is a pretty poetic and evocative word for a computer language, no? The short answer is this: the cascade refers to the order and importance of your style rules. Once you’ve practiced some basic CSS, we’ll revisit the cascade and you’ll explore some examples of why it’s important.
Writing CSS
There are three key decisions in writing CSS:
- Which element do I want to affect?
- What about it do I want to change?
- How do I want it to change?
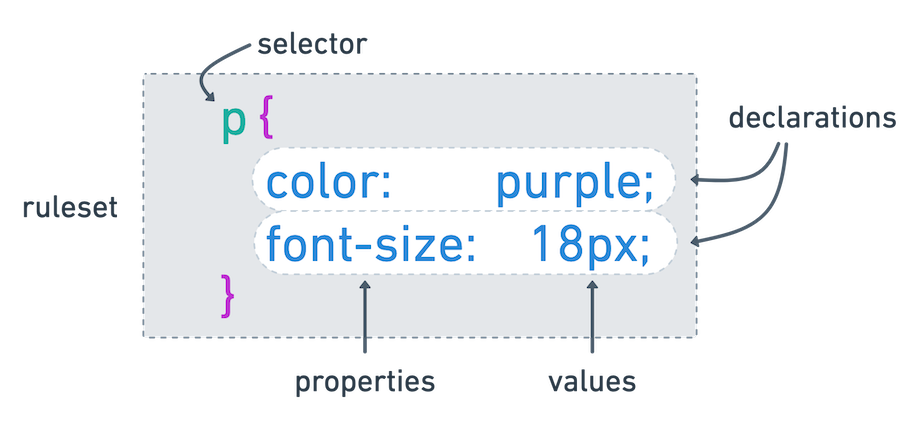
The element you are affecting is called a selector and the code you write to affect the selector are known as declarations. A declaration is made up of two parts: the area of your affect is a CSS property and the way you want it to change is the value. Combined, all of these things make a CSS ruleset.
p {
  color: purple;
  font-size: 18px;
}
CSS is a fairly readable language, which is why you may have gotten that question correct, even if this is the first time you’re looking at CSS code.
In this example, the p element is the selector and the declarations change the color of the text inside the p element to be 18 pixels in size and purple in color.
Multiple selectors can receive the same rules if they are separated by commas, like so:
h1, h2, h3 {
  color: green;
}
And a stylesheet is made up of multiple rulesets, like so:
h1, h2, h3 {
  color: green;
}
h4, h5, h6 {
  color: orange;
}
p {
  color: purple;
  font-size: 18px;
}
Looking through these examples, you may have noticed some basic expectations of CSS, specifically:
- selectors are separated with commas (
,) - declarations are wrapped in curly brackets (
{}) - properties may be hyphenated (but never include a space, so
font-sizeis correct andfont sizeis invalid) - properties and values are separated with a colon (
:) - every rule ends with a semicolon (
;)
Connecting your HTML and CSS
In order to use the CSS you write in a specific HTML document, you must first link the two files – and there’s an HTML element named link that does exactly this.
Note that the link HTML element is used to link to an external resource that is used within your HTML; it is entirely separate from the a element that creates hyperlinks in your HTML document.
A link element goes into the head section of your HTML. In HTML Basics you reviewed MDN’s Anatomy of an HTML document, which explained the head element like so:
This element acts as a container for everything you want to include on the HTML page, that isn’t the content the page will show to viewers. This includes keywords and a page description that would appear in search results, CSS to style content, character set declarations, and more.
For the purposes of your stylesheet, the link element has two important attributes:
rel, which is short for relationship, and explains the relationship between the documents being linkedhref, which stands for hyperlink reference and points to the document being linked; this is the same attribute used on anchor (a) elements
A properly formatted link element looks like this:
<link rel="stylesheet" href="style.css">
The link element can be added anywhere in the head element of your HTML file.
Practicing CSS
Remix my CSS Basics project and update the index.html by linking to the style.css file that also exists in that project, using the format above.
If your link works, you should see the paragraph text update to be red, like in this screenshot:
As you work through the following CSS lessons, keep using this project to test out what you’re learning.
link shortcut
If you are using VS Code and are working in an already saved HTML file (that is, a document with the .html extension), you can type link and then press the Tab key, which should result in a blank link statement for you, like this: <link rel="stylesheet" href="">. Note that you still need to update the href value.